Modules
HMR
The HMR module runs a Home Medicines Review from referral through to report, export, claiming and patient handout. Each review is a case on the pipeline – you prepare before the visit, plan your route, conduct the review in Scribe, export the report, then claim through PPA.
The steps below follow the workflow most pharmacists use: add the patient, click Review to open a case, prepare for the visit, plan your route, start the consult in Scribe, complete medicine reconciliation, write the report, export, then claim and optionally create a handout.
The flow at a glance
How the HMR module is organised
Open HMR from the main navigation. Across the top you will find:
- Patients – all HMR patients and their review status. Click Review here to start a case.
- Pipeline – the Kanban board where each case appears after you click Review.
- Travel Log, Referrals, Referrers, Reports, Claims and Dashboard for records, claiming and overview.
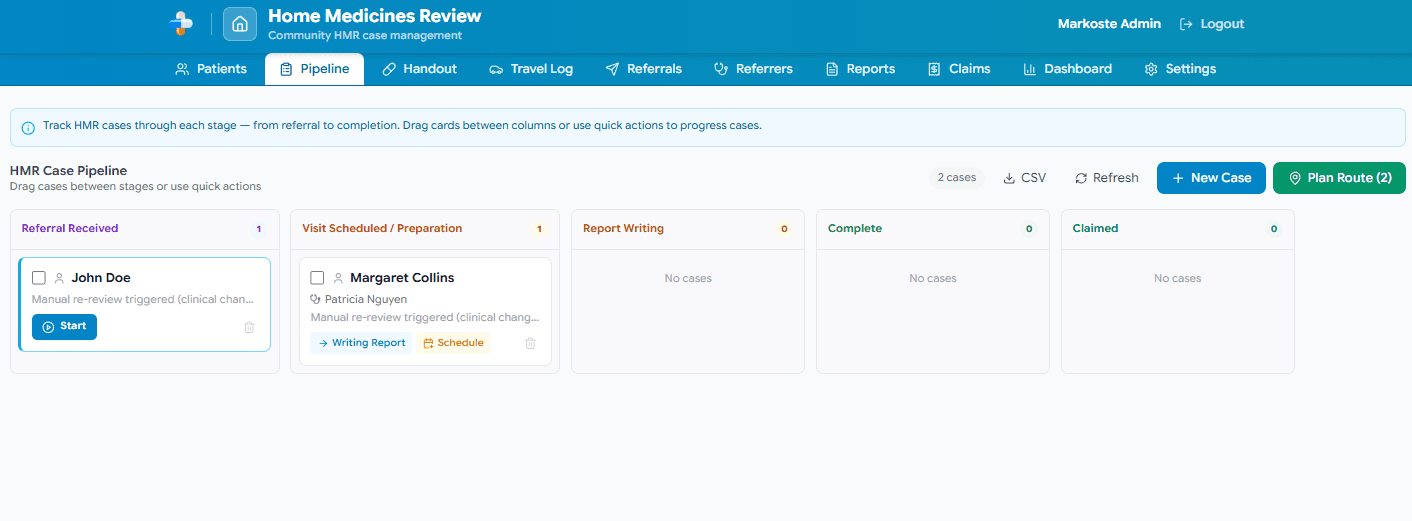
Pipeline stages are: Referral Received, Visit Scheduled / Preparation, Report Writing, Complete, and Claimed.
Step 1
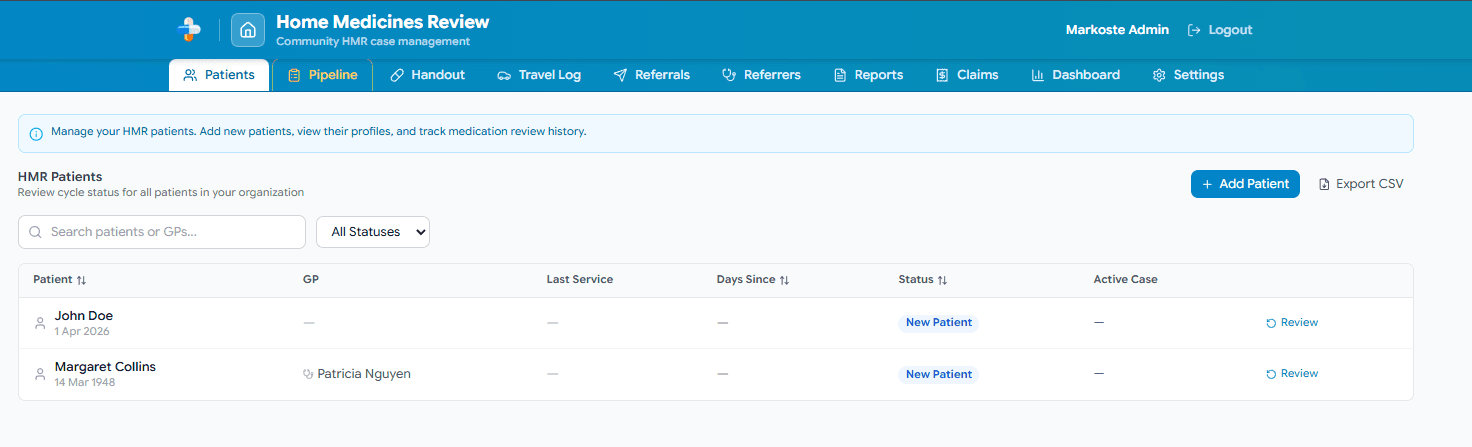
Manage your HMR patients
View all HMR patients
Start on the Patients tab to see everyone in your HMR program. Add new patients and check who is due for review.
Step 2
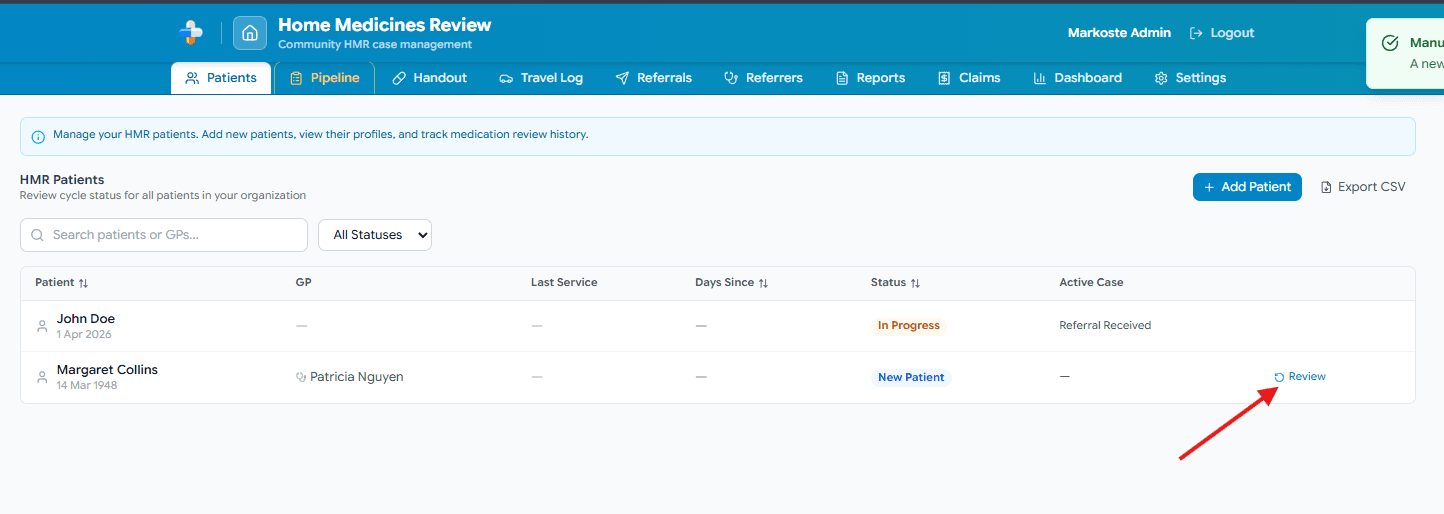
Initiate the medication review
Click Review to open the case
Click Review on the patient row to initiate the medication review workflow and open the preparation steps for that patient.
Good to know
The patient will not appear on the Pipeline Kanban board until you click Review and the case is created.Step 3
The pipeline board
Track each case on the Kanban board
Switch to the Pipeline tab. Once you have clicked Review, the patient appears as a card in a stage column. Drag the card between columns as the review progresses, or click it to open the case drawer.
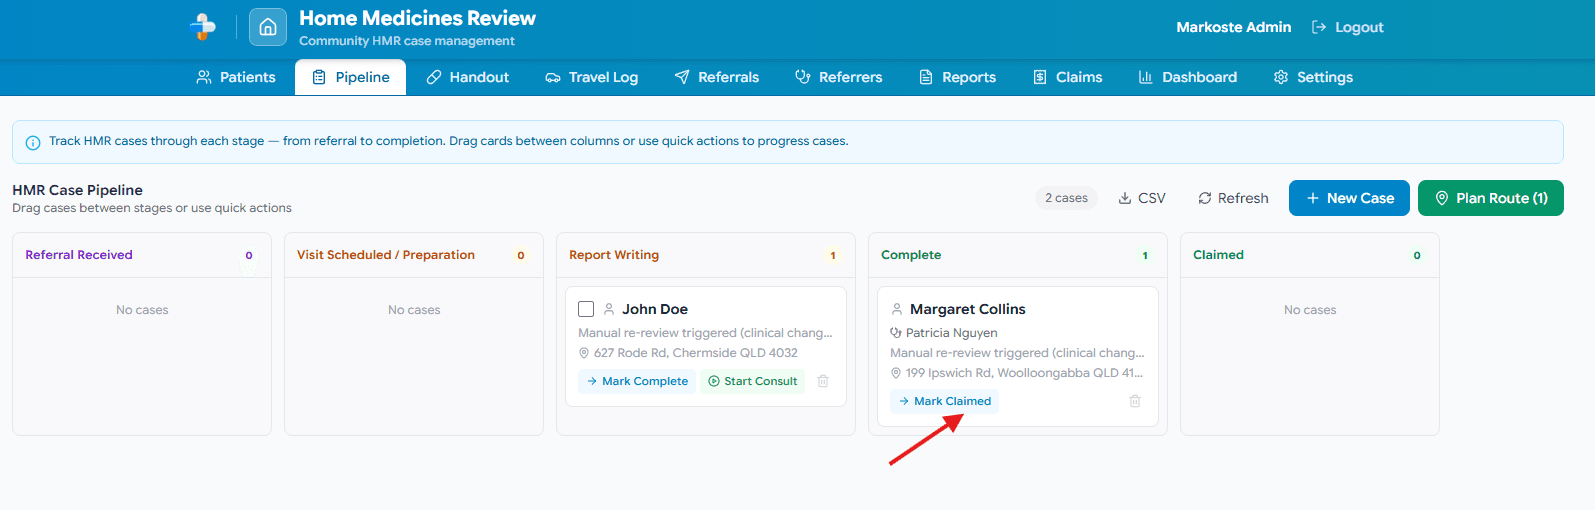
Move cases to Complete and Claimed
When you save the finished report, move the case to Complete. After you submit the PPA claim, move it to Claimed. The board gives you a clear picture of every HMR in progress.
Step 4
Start pre-visit preparation
Open the pre-interview preparation flow
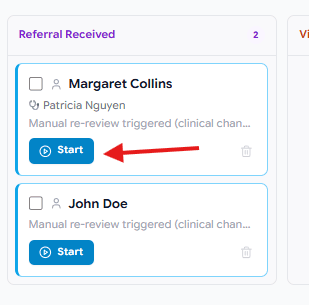
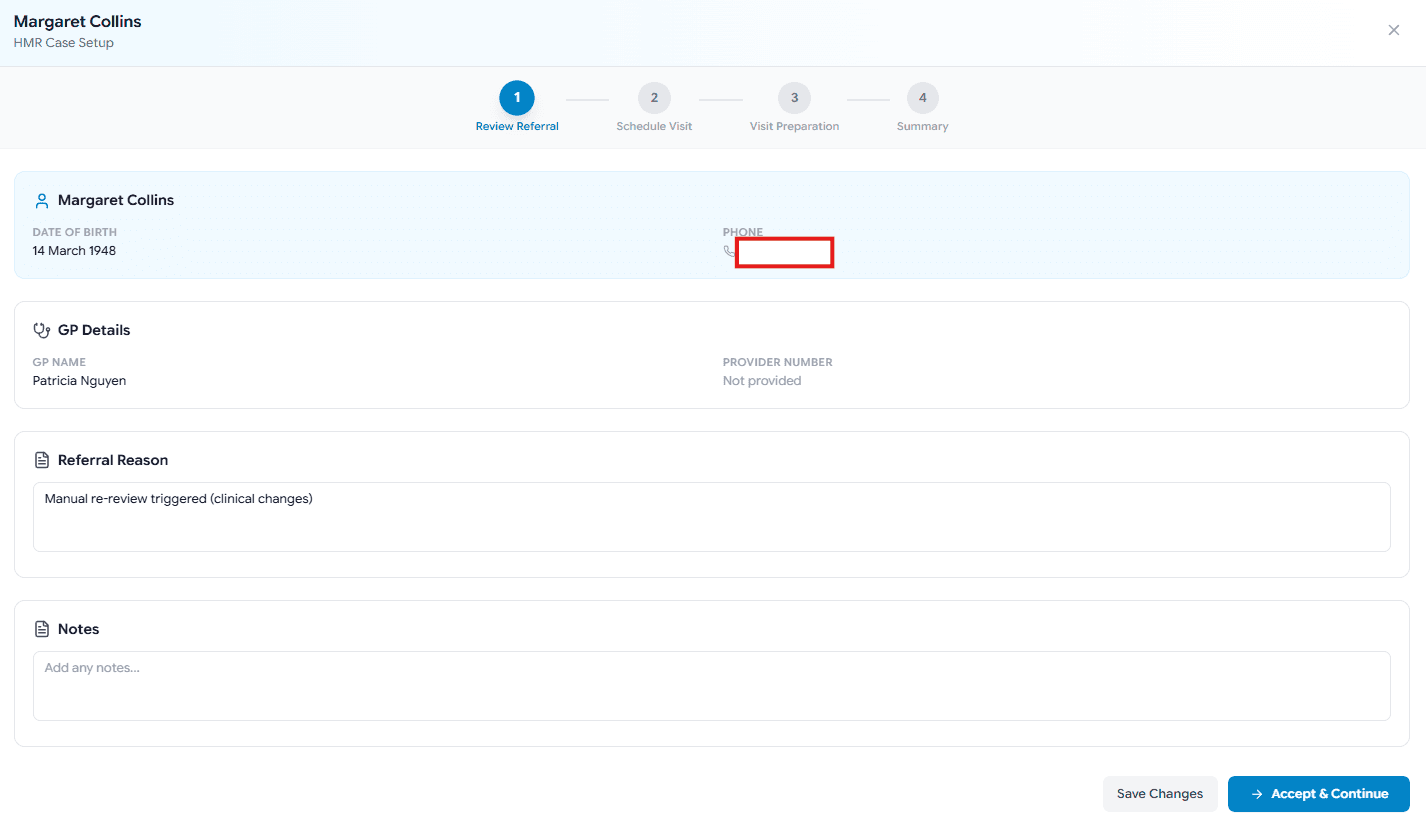
On a case in Referral Received or Visit Scheduled, click Start to open the pre-visit preparation wizard. This walks you through referral review, scheduling, and visit preparation before you go to the patient's home.
Step 5
Schedule and prepare for the visit
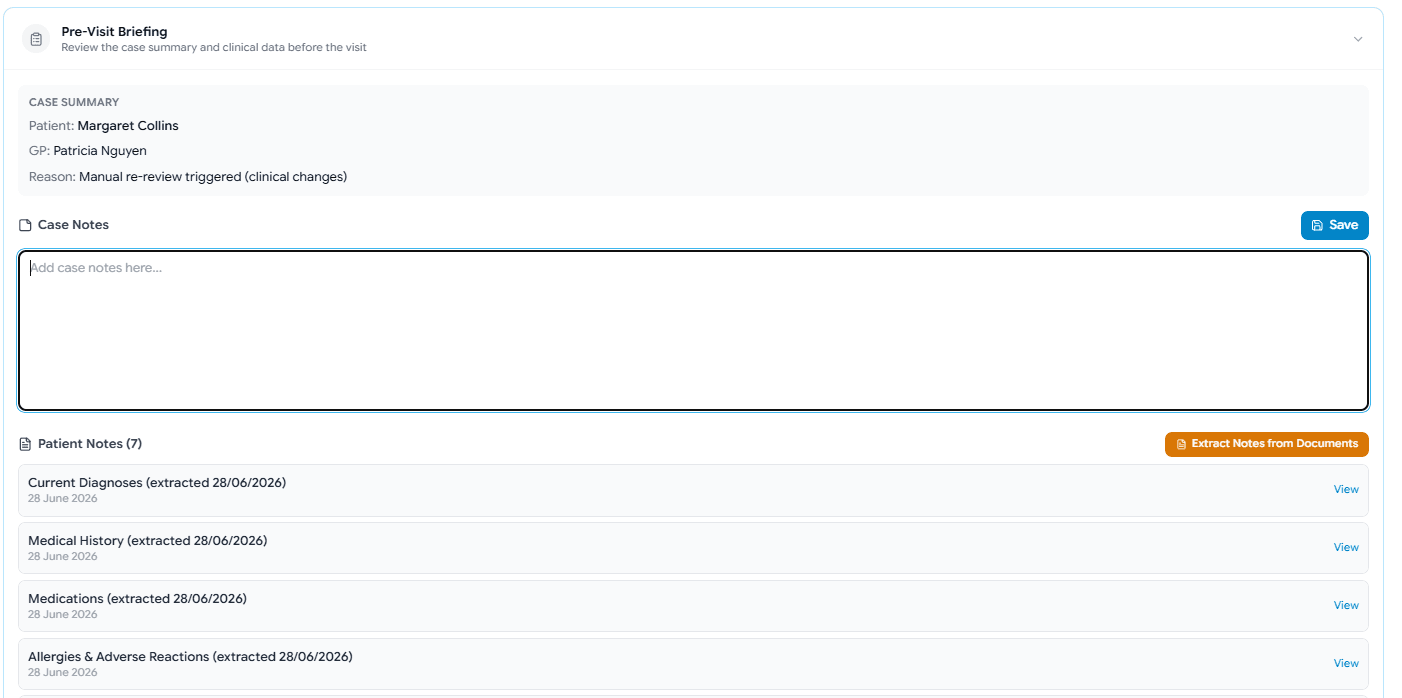
Add pre-interview notes
Fill in any notes about the patient during pre-interview preparation. These notes stay with the case and can feed into the report.
Schedule the date and time
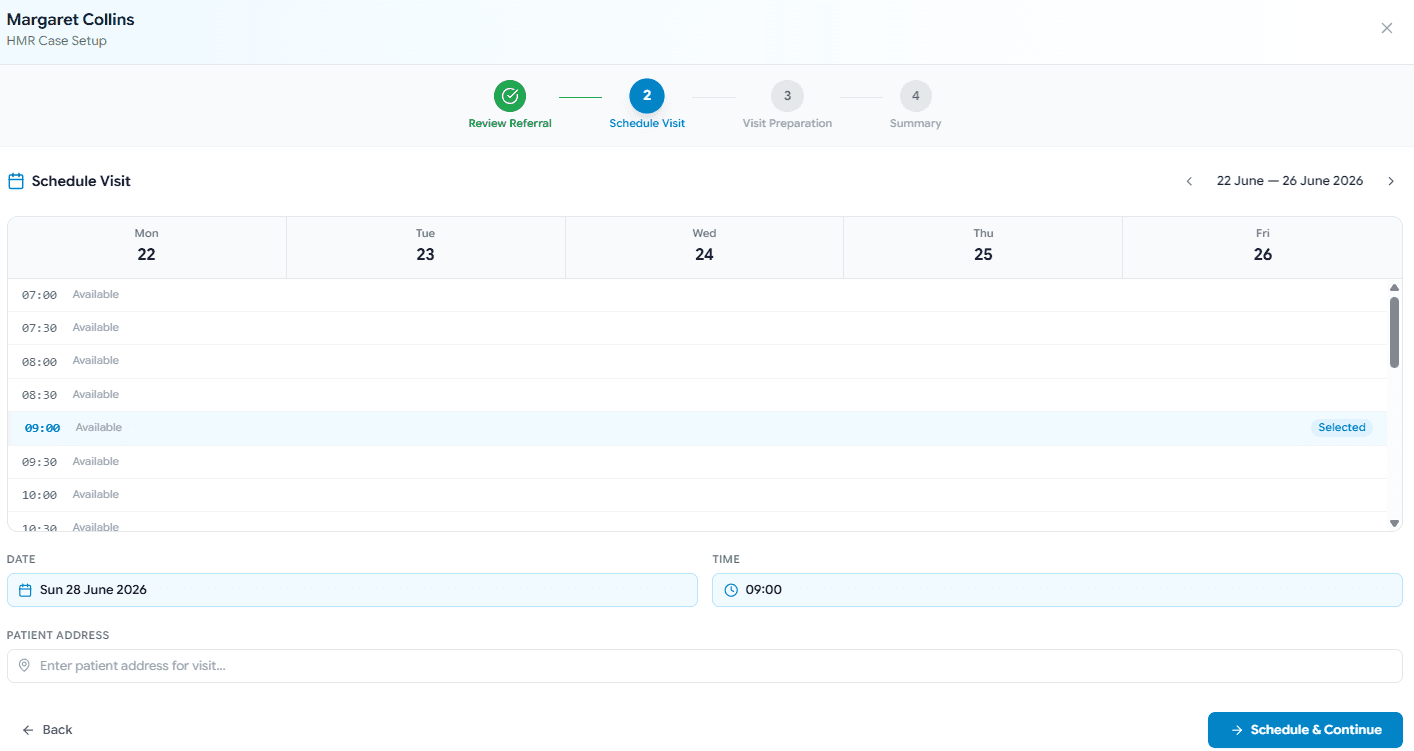
In the case flow wizard, accept the referral and schedule the visit. Enter the date, time and confirm the patient's address for the home visit.
Review the referral and drug interactions
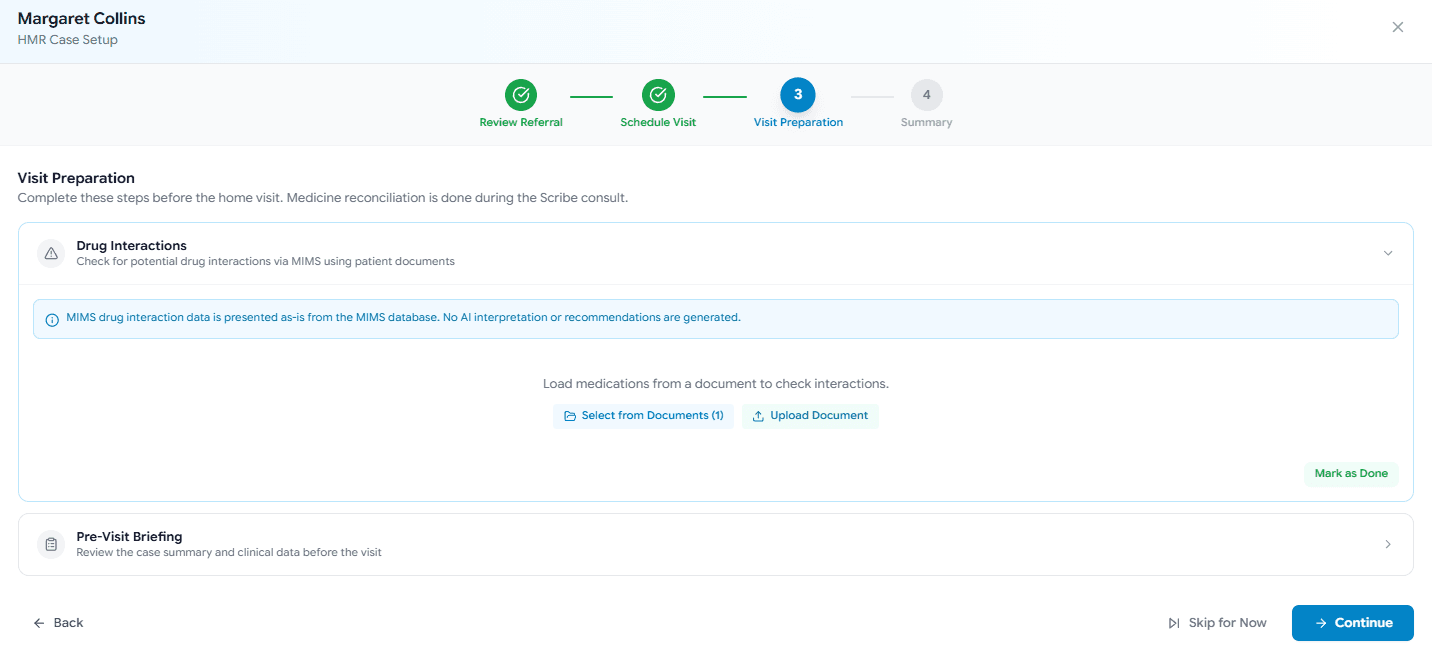
Select the patient's referral form and review any drug interactions flagged from their documents. This helps you know what to focus on before you arrive.
Generate a pre-visit briefing
Click Generate pre-visit briefing so Markoste summarises the key medicines, interactions and referral points you should discuss with the patient.
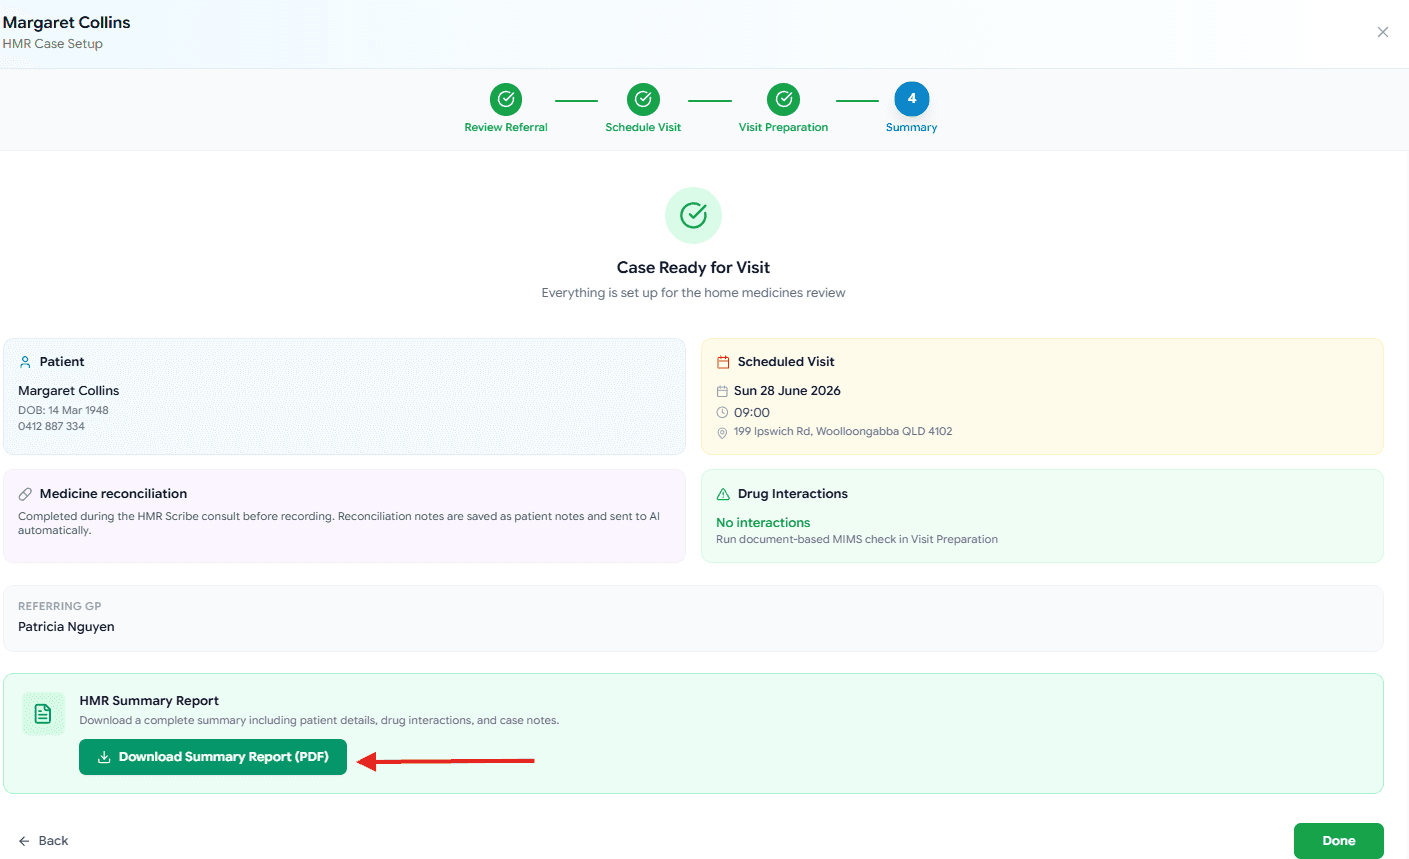
Download documents to take with you
Download the referral and any other prep documents so you have them on your device and know exactly which issues to discuss with the patient at the home visit.
Step 6
Plan your route
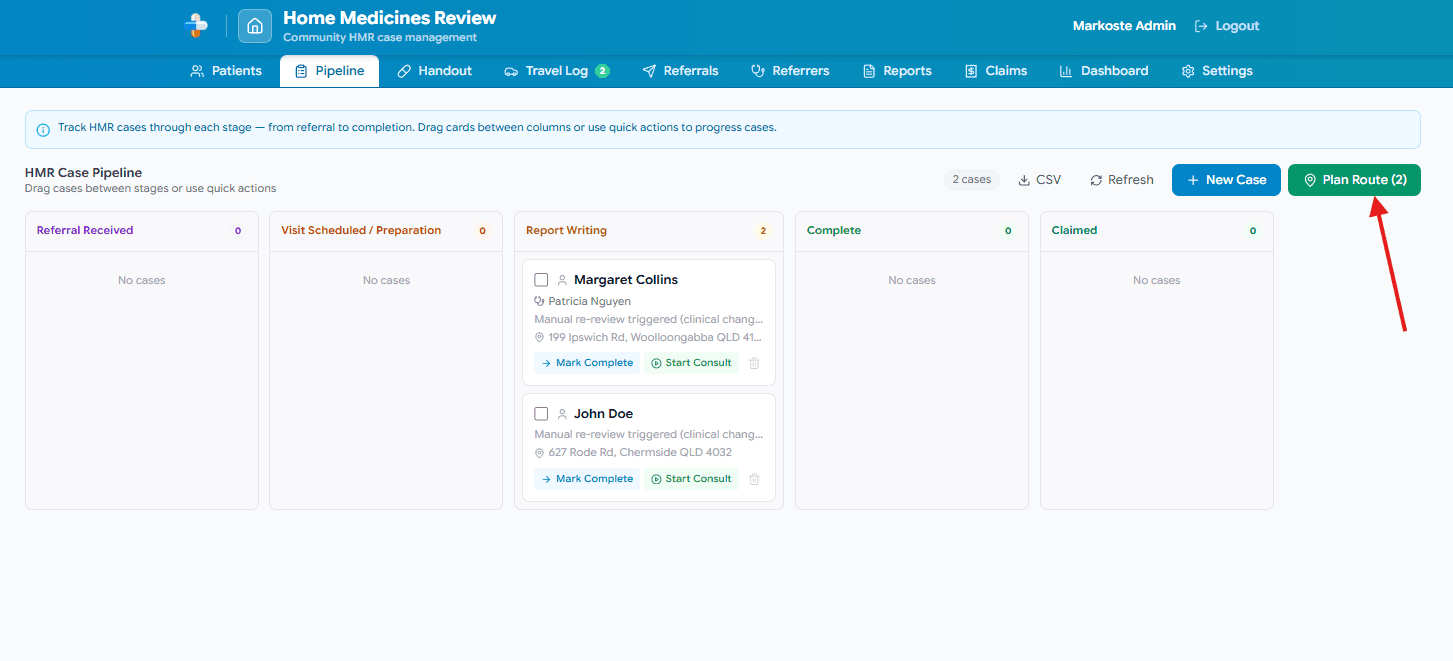
Plan route for the day
When you have finished preparing your HMR patients for the day, select Plan Route on the pipeline to map out the best order for your home visits.
Enter the patient's address
Make sure the patient's address is entered on the case. Markoste uses this to calculate the most efficient route between home visits.

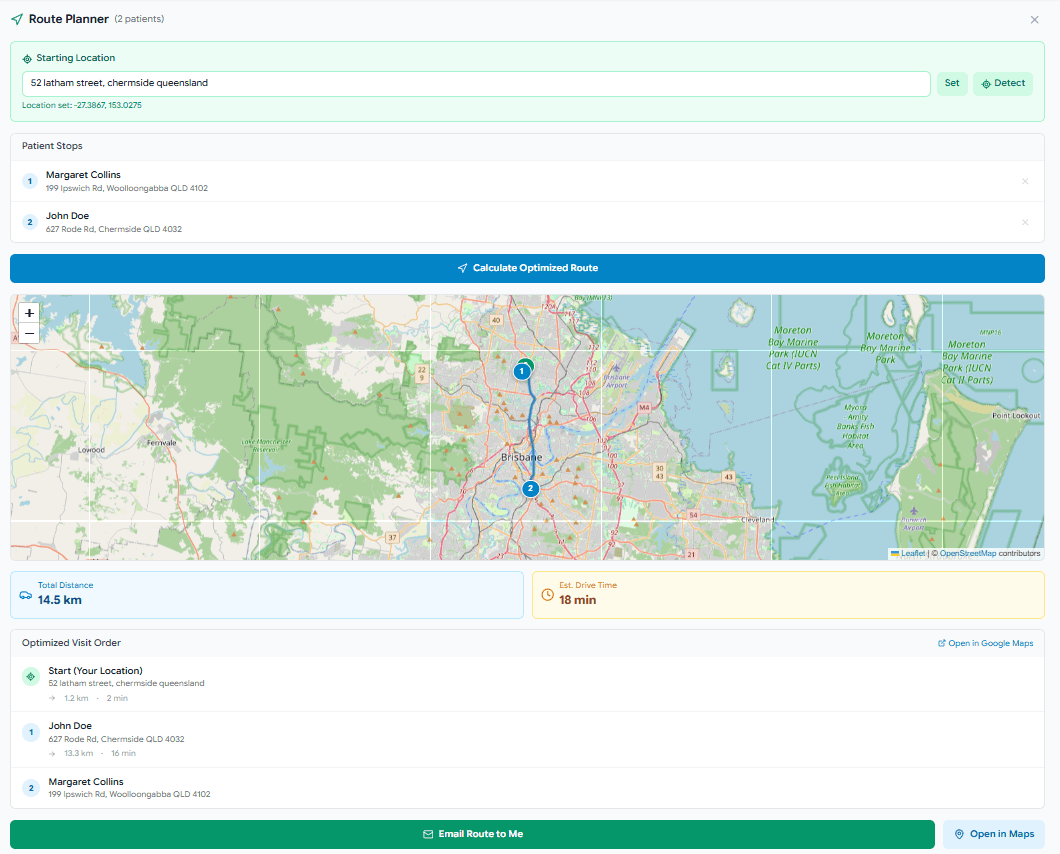
Select your starting point
Select your starting point and Markoste calculates the most optimised route so you reach each patient's home faster and more efficiently.
Step 7
Start the consult in Scribe
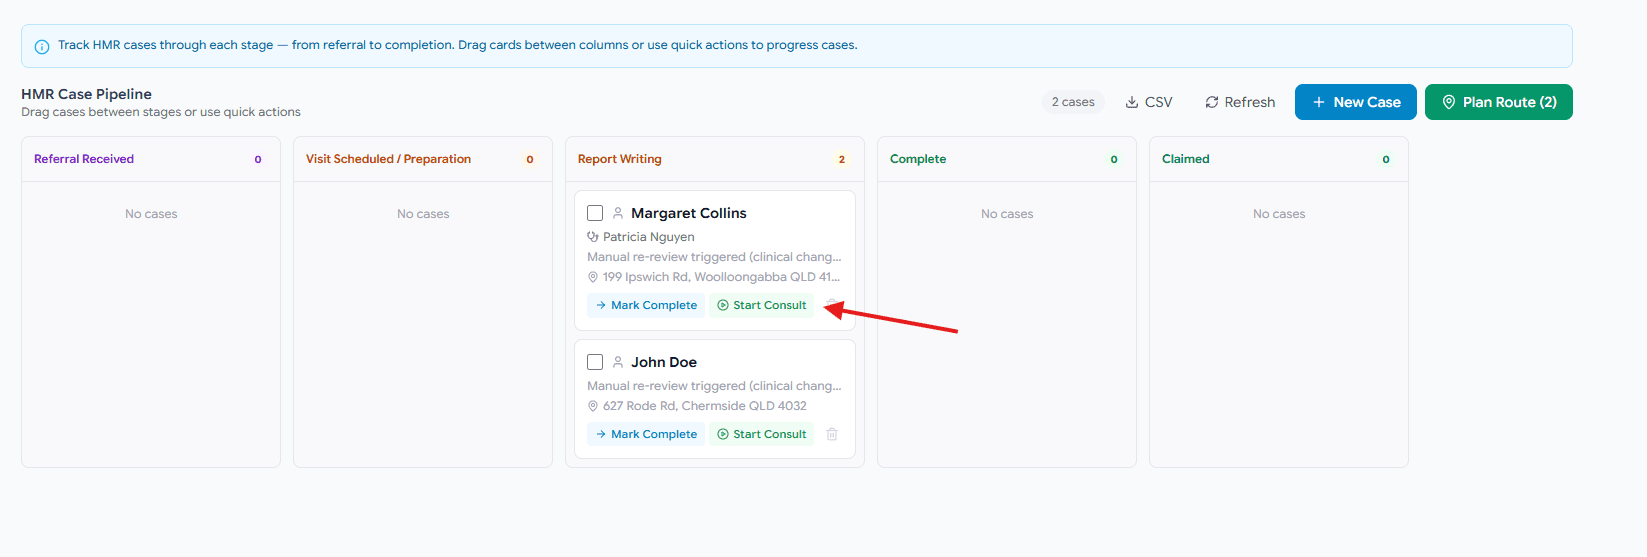
Click Start Consult on the pipeline
From the Pipeline tab, click Start Consult on the patient's card. This opens Scribe and is required before you can run medicine reconciliation or write the report.
When you are at the patient's home, ensure you have a strong internet connection. If you plan to record the entire conversation, obtain the patient's consent first.
Good to know
You must click Start Consult before Conduct medicine reconciliation appears in Scribe.Step 8
Medicine reconciliation, notes and documents
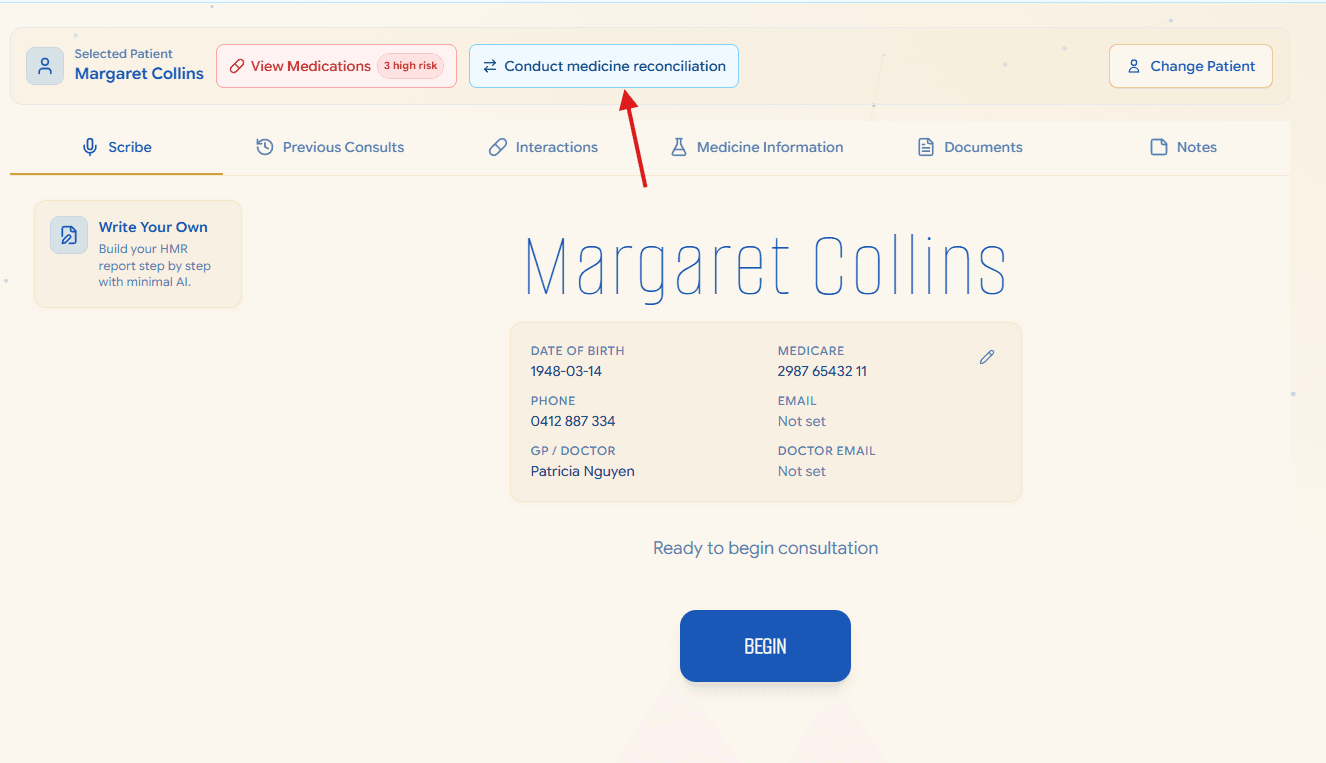
Conduct medicine reconciliation
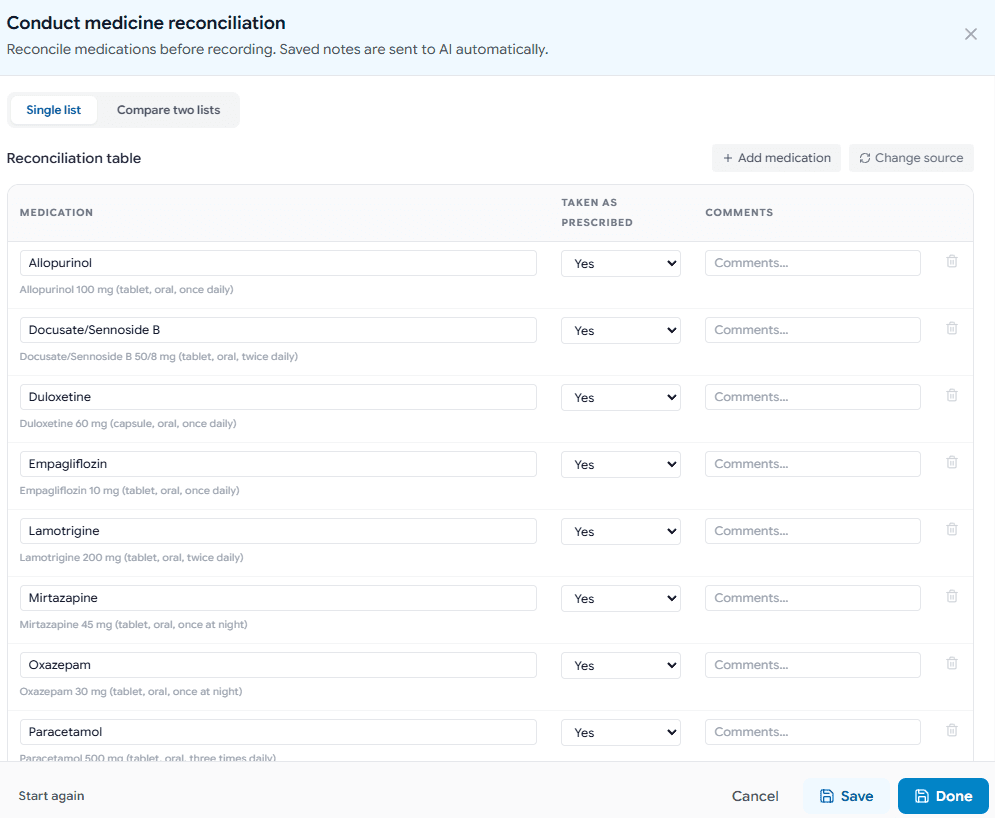
From the HMR pathway in Scribe, open Conduct medicine reconciliation. Compare the medicines on the referral and documents with what the patient is actually taking. This builds an accurate list before you record the consult.
Add comments that flow into the report
Add comments beside individual medicines in the med rec form. These notes are saved and included automatically when you generate the HMR report in Scribe.
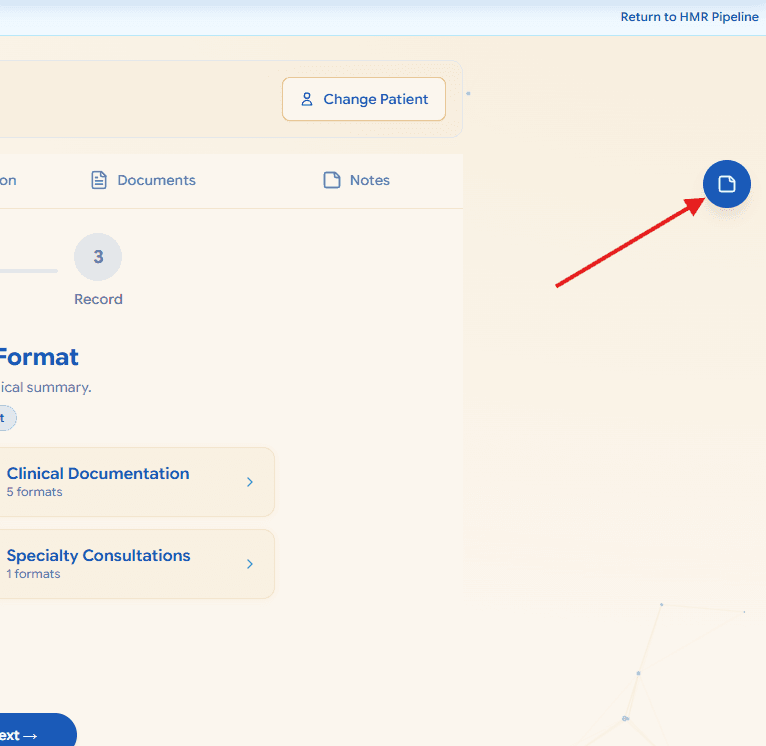
Use the Notes tab in the case drawer
In the case drawer, open the Notes tab (blue button). Add any clinical notes about the patient that you want included in the finished report.
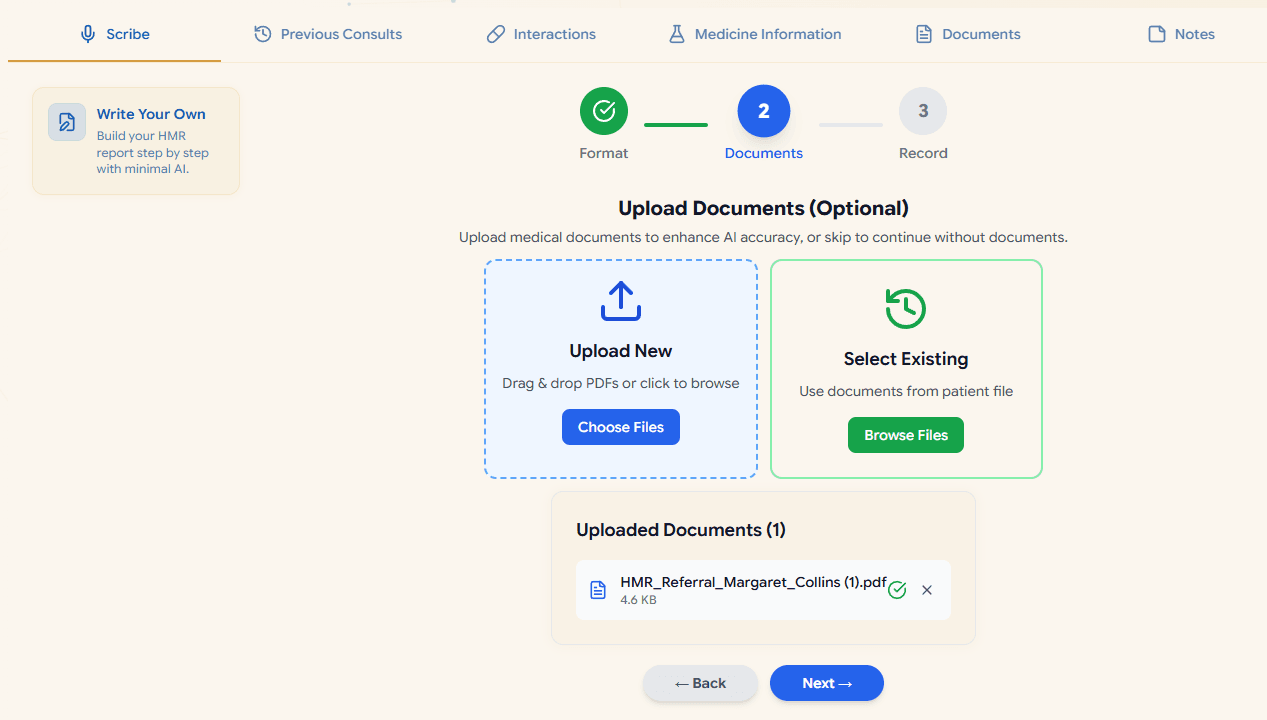
Upload supporting documents
Upload documents that will help generate the report – GP referrals, hospital discharge summaries, medication lists and any other relevant files.
Step 9
Write the HMR report in Scribe
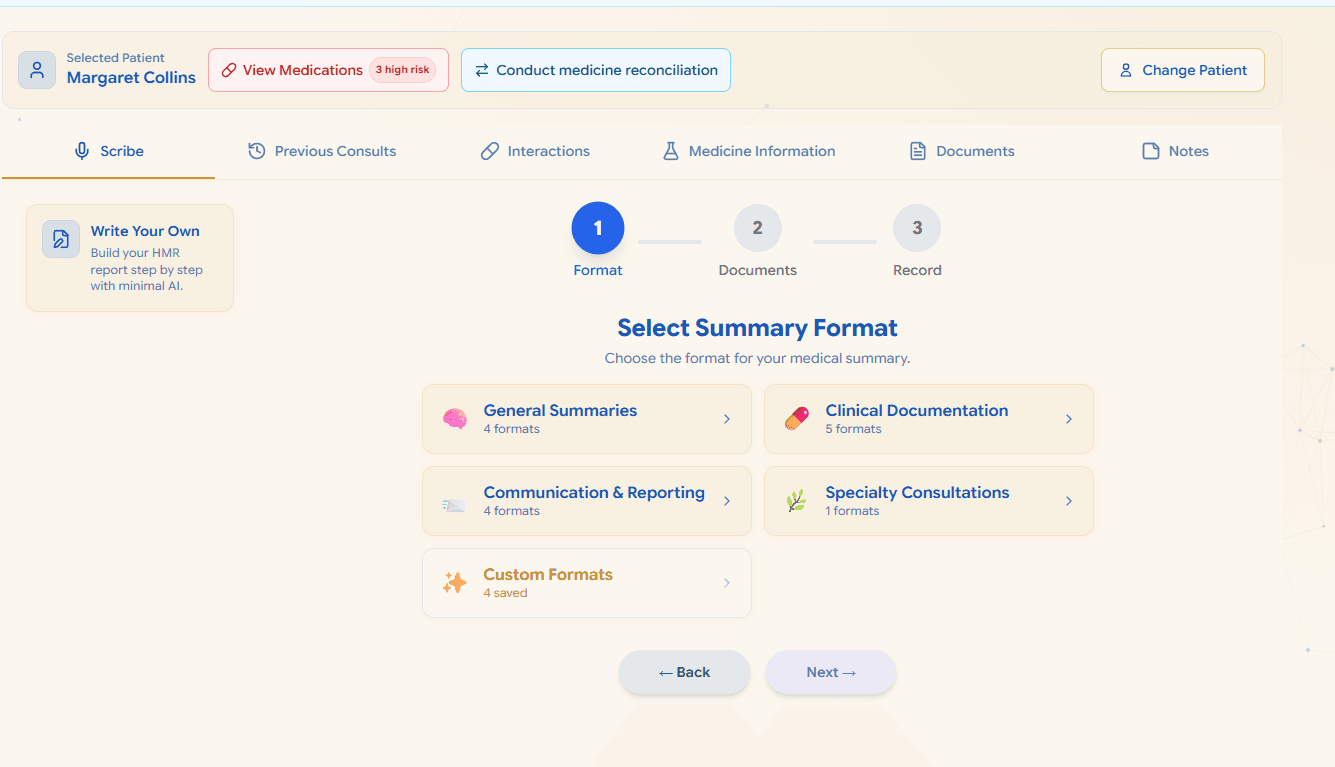
Choose your report format
Select your format in Scribe – the same options as a normal consultation, such as medication review or a custom template.
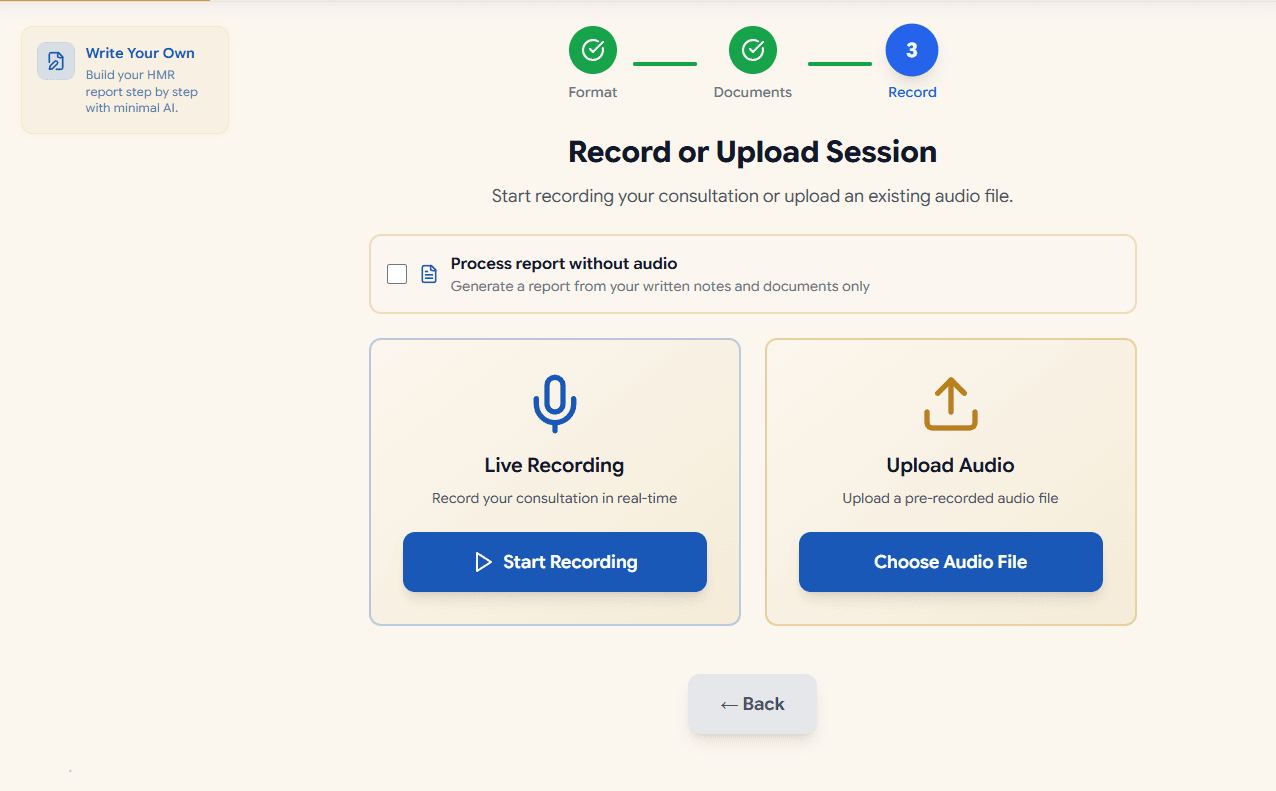
Record the consult after the visit
Record the audio in Scribe after the home visit. We recommend talking to Markoste once the HMR is finished, so you can summarise clearly how you want the report written rather than trying to document everything during the consult.
Tip
Med rec notes, case notes and uploaded documents from the HMR pathway are included automatically when you process the report.Step 10
Save the report
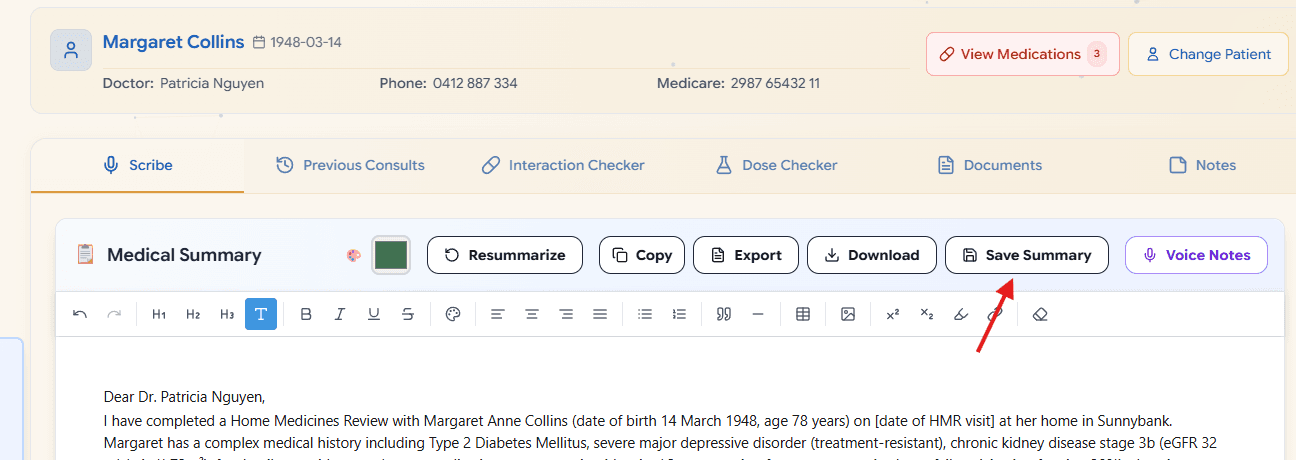
Save the report
When the report is ready, click Save. You can then export the report, submit an HMR PPA claim, and – if the patient needs one – schedule an HMR follow-up from the report recommendations.
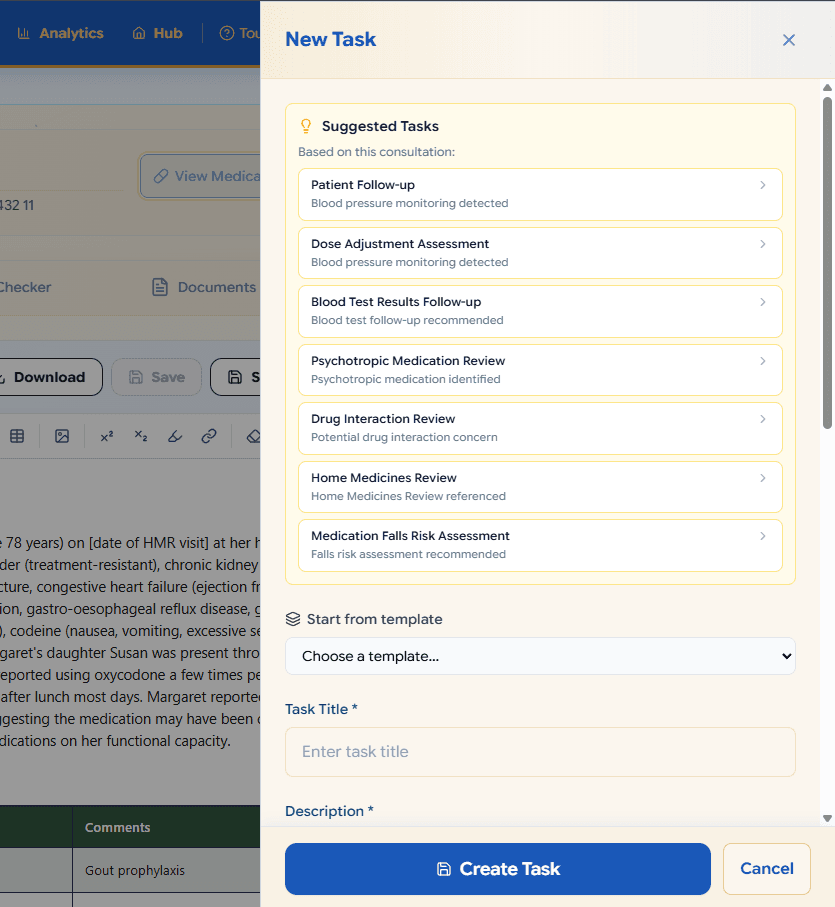
Add a PharmCal follow-up (optional)
Markoste offers to create a PharmCal task for the follow-up, pre-linked to this patient and report. Add it if you want the next review in your calendar straight away.
Tip
After claiming, Markoste can also ask you to schedule an HMR follow-up from the report recommendations. That list and the GP letter are covered in the Follow-ups guide.Step 11
Export the report
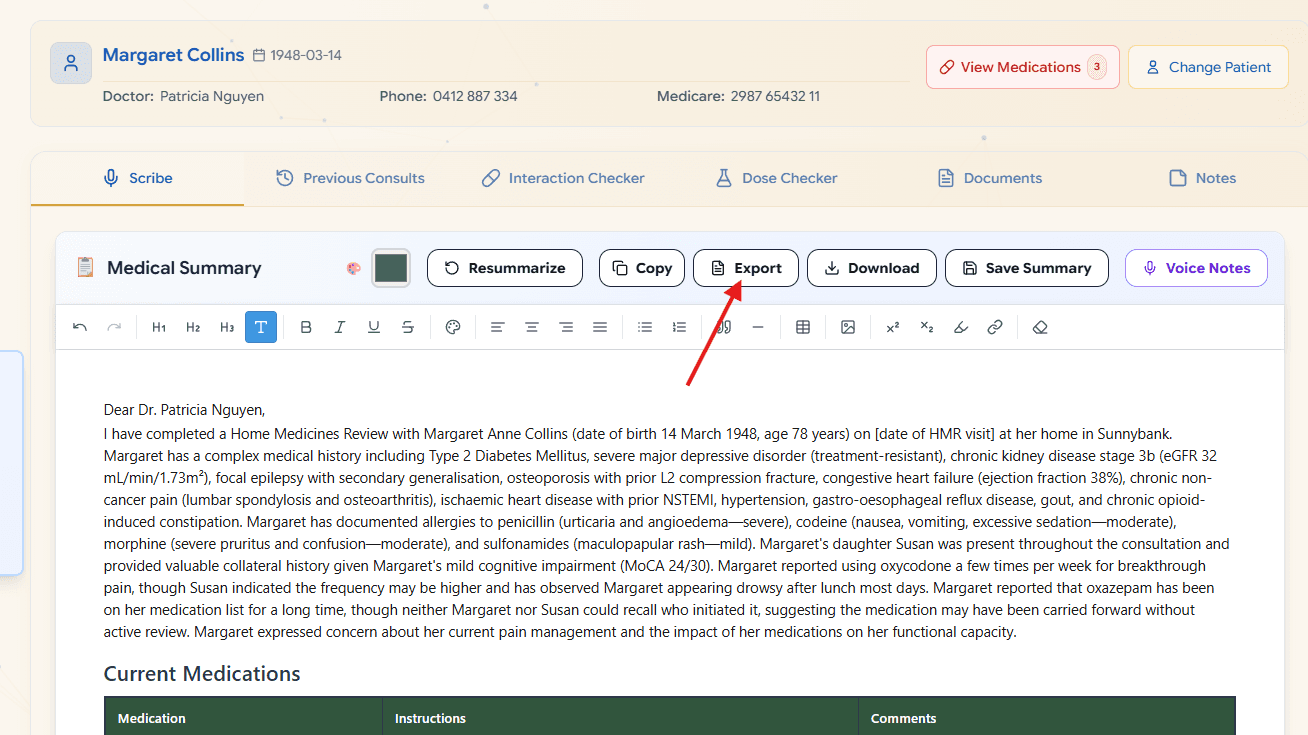
Export to a custom template
If you use a custom format, click Export. Markoste takes the report content and transfers it directly onto your Word template. The Markoste output in the editor is an intermediate draft you review first.
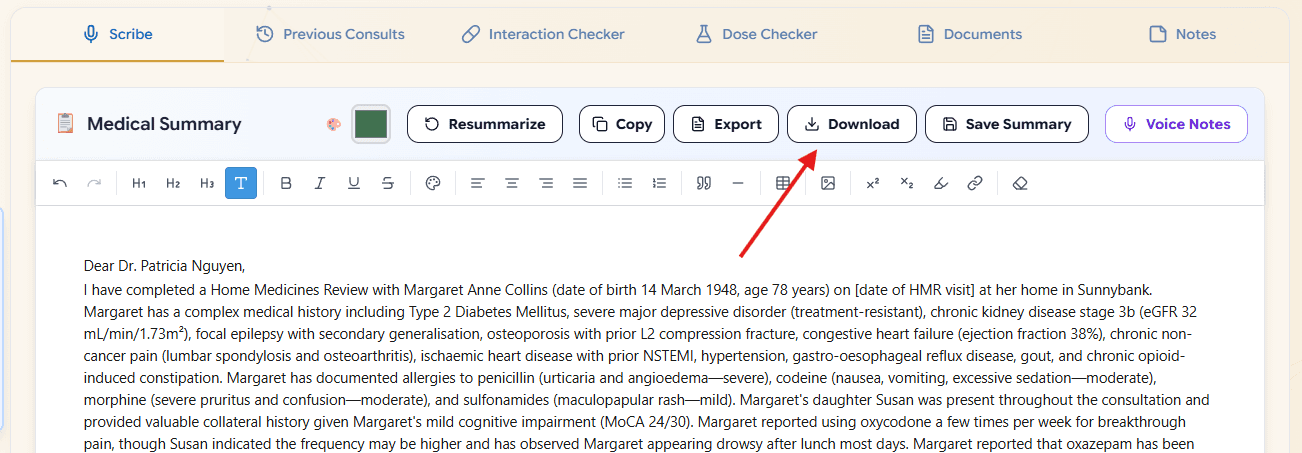
Download as PDF or Word
If you are not using a custom template, Download as Word and make final edits on your computer, or save as PDF for sending to the GP.
Step 12
PPA claiming and pipeline
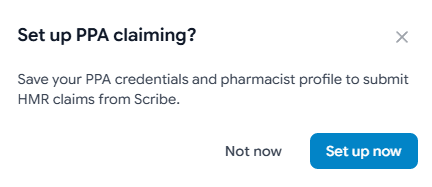
Set up and submit PPA claiming
The first time, set up your PPA claiming credentials and pharmacist profile. Then complete the claim fields and submit the HMR claim to PPA. You can also finish later from HMR → Claims.
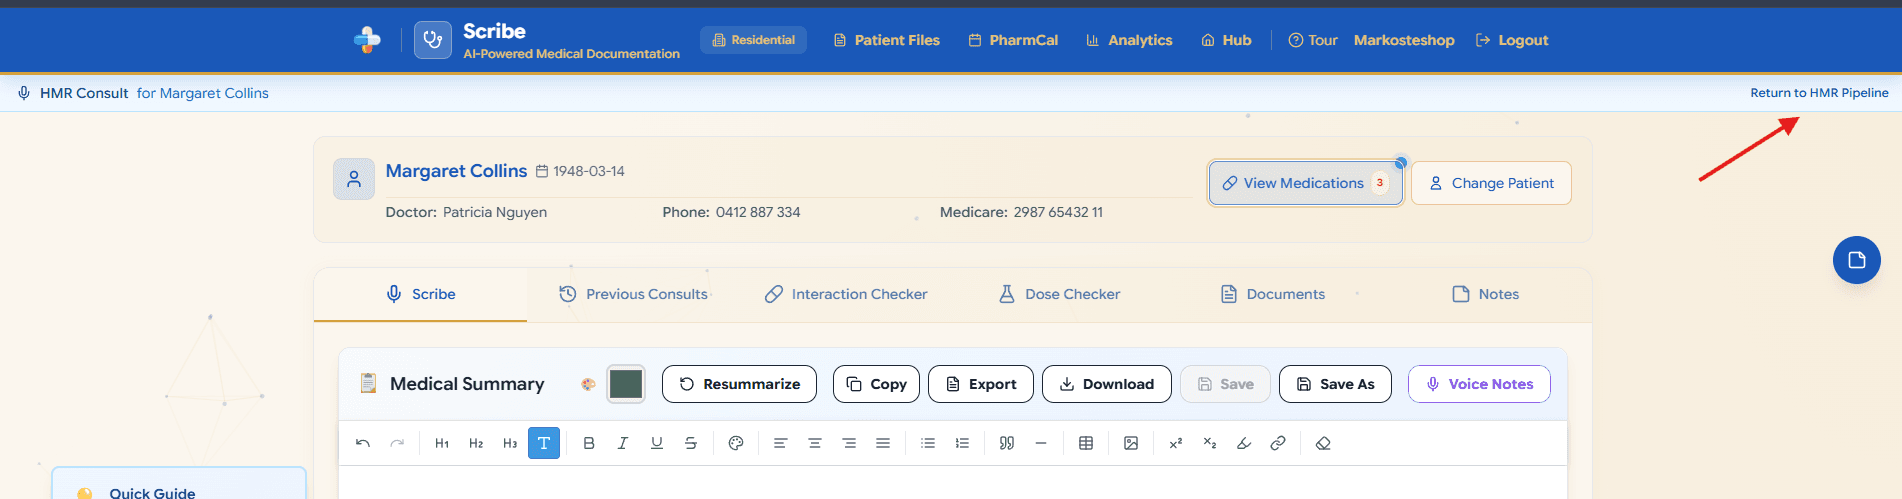
Return to the HMR pipeline
When you are done with the report and claiming, return to the HMR pipeline and move the case to Complete or Claimed as appropriate.
Step 13
Patient handout
The Handout tab (on eligible plans) lets you create a patient-friendly medicines list with pill images – a step beyond the standard HMR report that improves health literacy.
Create a patient-friendly medicines handout
The patient handout is for pharmacists who want to go further and give the patient a clear list of their medicines in plain language, with an image of each pill where available.

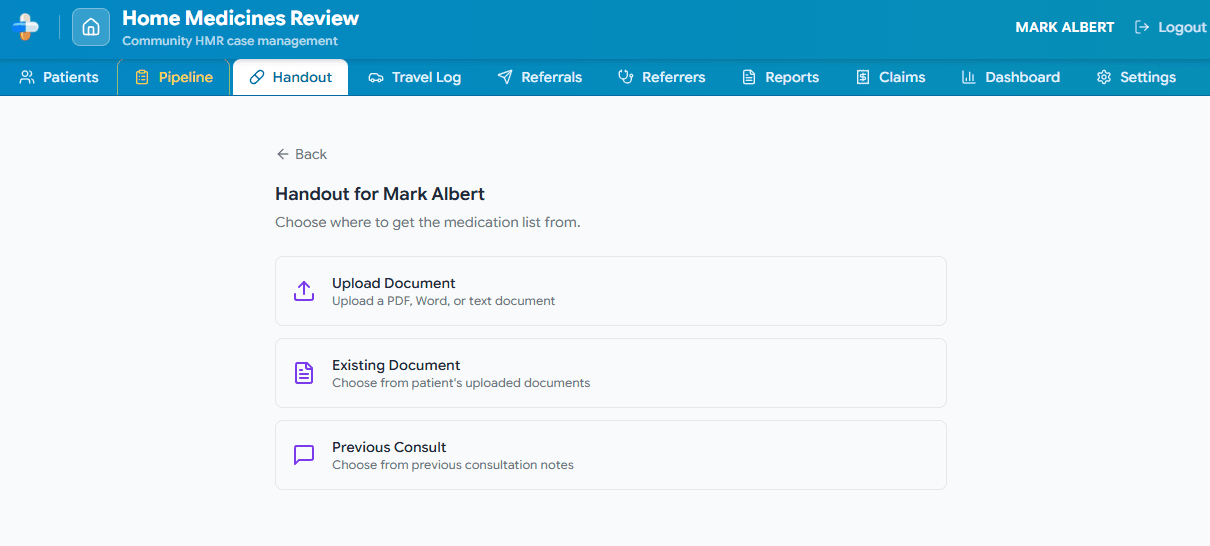
Use an existing document or upload a med list
Use a document already in the patient's file, or upload a document with their current medicine list, to populate the handout.
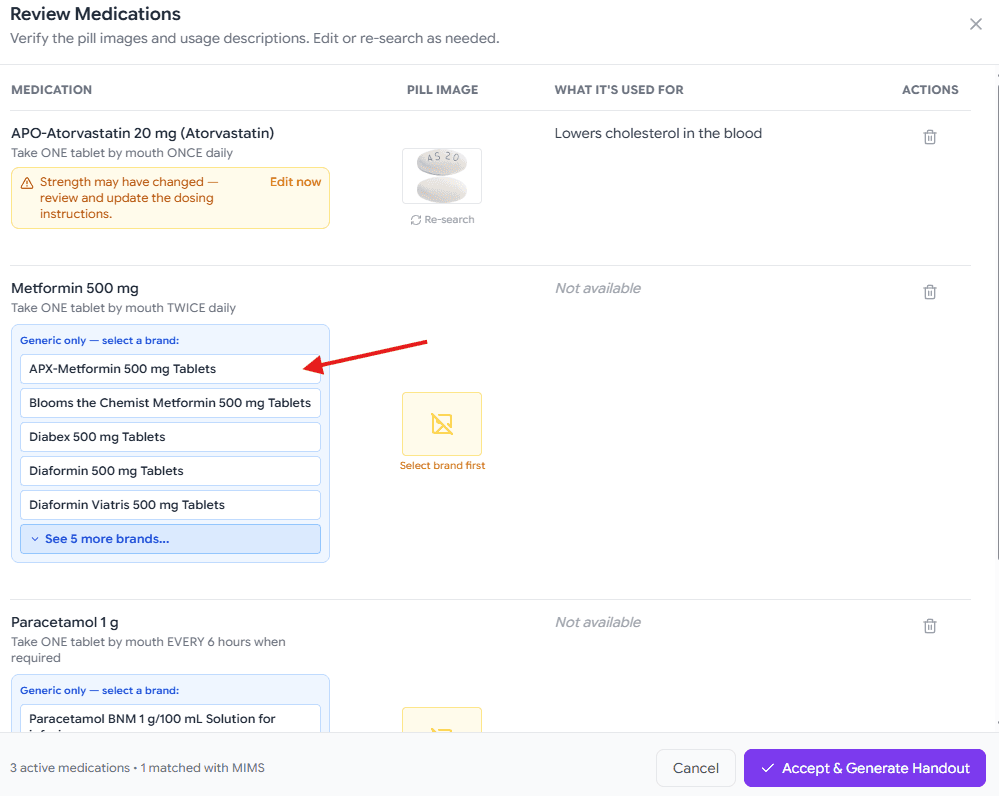
Choose the pill brand for images
For each medicine, choose the brand. Markoste shows the pill image associated with that brand from MIMS so the patient can recognise their medicines at home.
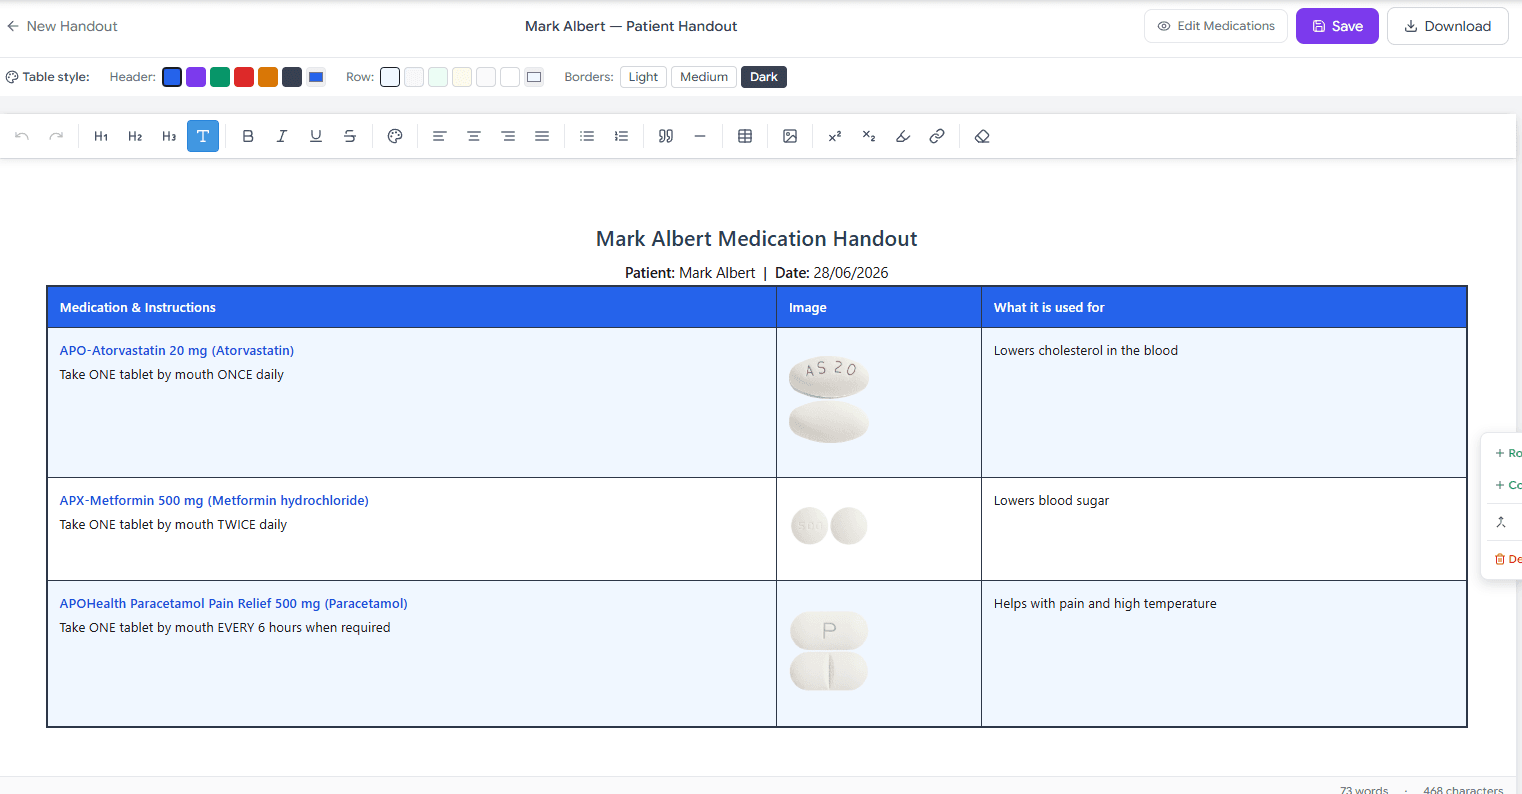
Edit, download and print for the patient
Make any edits or adjustments, then download and print the handout for the patient to take home. It is an easy way to improve health literacy and support medicines understanding.
Tip
Pill images and product details come from MIMS, so the handout stays accurate and easy for the patient to follow.